Getting started
Getting started with MIND AIoT
One MIND AIoT Node, one account and your hardware are enough to begin. This page explains what MIND AIoT is, what to prepare and how the setup runs before you start writing a memory card.
What MIND AIoT is
MIND AIoT is a software platform for monitoring and control. It is built around the MIND AIoT Node: an embedded Linux computer running MIND AIoT Node OS, with memory for the system and an encryption key. The node runs on your site and connects the sensors and equipment you choose. The cloud backend stores data and runs agentic workflows. A dashboard is where you follow the data, manage devices and describe what you want the system to do. MIND AIoT is already in use in systems and facilities, and it is licensed as software: the hardware — the node and its components — stays your choice.
AIoT means Agentic IoT: agents build and maintain the software that connects your hardware, keeps an eye on the operation and turns your data into reports. You describe the goal; the platform develops, tests and deploys the change.
Any component with an analog or digital interface can connect to the node — directly or through a third-party interface, wired or wirelessly. The available interfaces include Bluetooth, WiFi, Ethernet, I2C, SPI, USB, analog and Modbus, as supported by Raspberry Pi 5 and embedded Linux.
Software integration, not physical installation. MIND AIoT connects and monitors the hardware you install. Electrical work, safety and mechanical installation follow your own site requirements and any agreed delivery scope.
What you need
Hardware
The MIND AIoT Node is the computer MIND AIoT runs on. Supported today: Raspberry Pi 5, Raspberry Pi 5 Compute Modules and third-party products built on the Compute Module. Support for more embedded Linux computers is planned.
| Item | Notes |
|---|---|
| Raspberry Pi 5 | The supported node computer, with a suitable power supply. Compute Module products are also supported. |
| microSD card | 16 GB, industrial grade — or the storage provided by the module or product. Low-quality cards are a common cause of failed starts. |
| Encryption key | One hardware key per node, paired with the memory card or module storage during installation. |
| USB memory stick | Used during encryption. Use a good brand and enough capacity for the node storage. |
| Ethernet cable | With internet access and automatic (DHCP) addressing. |
| Sensors and actuators | Components with an analog or digital interface. Start with one sensor if you are testing. |
| Computer with a card reader | To write MIND AIoT Node OS to the memory card. |
Software and accounts
- The MIND AIoT Node OS image for Raspberry Pi 5, downloaded during installation.
- An image writer such as Balena Etcher (Windows, macOS or Linux).
- A phone, tablet or computer with WiFi, to reach the node's local dashboard.
- A MIND AIoT account for the cloud dashboard. Create it during registration.
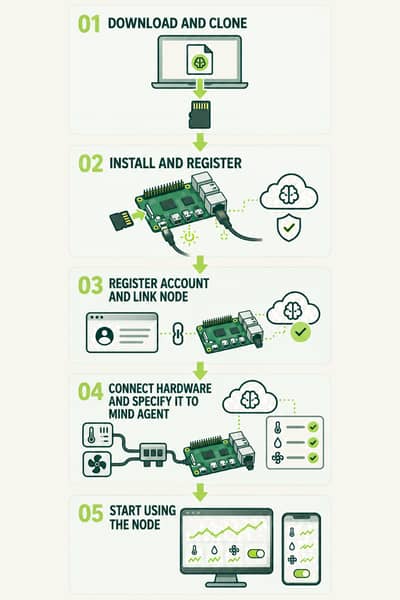
Setup at a glance
Write MIND AIoT Node OS
Download the MIND AIoT Node OS image and write it to the memory card. Install MIND AIoT Node OS.
Start and encrypt the node
Assemble the node, power it on and complete encryption on the local dashboard.
Register and link
Create the device code, then register and link the node in your account. Register and link the node.
Describe components and behaviour
Say what is connected and what it should do. Components and behaviour.
Monitor and adjust
Follow live data, set alarms and create reports. Dashboards and monitoring.
What to expect
Allow a few hours for a first installation. Writing the image takes 15–30 minutes, encryption can take up to 90 minutes, and the node can take a further 15 minutes to appear in the cloud dashboard after it starts. Do not power the node off during encryption.
Set up on the bench first. Complete the image, encryption and a first sensor test before the node is assembled into an operating installation. It is much easier to find a loose cable or a wrong key on a table than inside a cabinet.
New components and features are developed on a test node first; operating nodes keep running. Nothing is deployed before you accept it.
Keep the memory card and its encryption key together and labelled. The pair is unique to that node; if either is replaced, the node is installed again from MIND AIoT Node OS.